How to Install REGUPOL Rubber Mats and Rolls on Different Surfaces: An Overview Guide for Australian Horse Owners
Upgrading your equine facility with REGUPOL rubber mats is a smart investment for comfort, safety, and cleanliness. Whether you’re installing in a stable, wash bay, horse float, or walkway, correct installation is essential for long-lasting results. This simple guide gives you a clear overview of how to install REGUPOL rubber mats, tiles, or pavers on concrete, timber, asphalt, and compacted bases, so you can get the job done right, the first time.
Why Choose REGUPOL Rubber Mats?
REGUPOL mats are made for Australian conditions. They’re durable, easy to clean, and provide excellent cushioning and slip resistance for horses. With REGUPOL, you’re choosing a trusted brand that stands for quality, comfort and peace of mind.
General Preparation Steps
· Clear the area: Remove any old flooring, debris, or loose materials.
· Check for level: The surface should be as flat as possible, with no major bumps or dips.
· Dry and clean: Make sure the area is dry and free of dust, oil, or moisture.
· Condition your mats: Lay out your REGUPOL mats and let them adjust to the room temperature for at least 24 hours before installation.
· Inspect materials: Check for visual defects, correct style, and quantity before starting.

Installing on Concrete
Concrete is a popular, sturdy base for rubber mats.
Steps:
1. Check moisture: Concrete should be cured and dry.
2. Seal and Prime: Apply REGUPOL barrier 99-101 moisture sealer to seal the concrete and prime the surface.
3. Positioning Rolls (Aussie Gold):
· Mark a straight chalk line for your first roll.
· Unroll all material in the same direction (do not flip rolls; face side is on the inside).
· Allow 75–100mm extra length for trimming after conditioning.
· Let the rolls relax for at least 24 hours before final trimming and adhering.
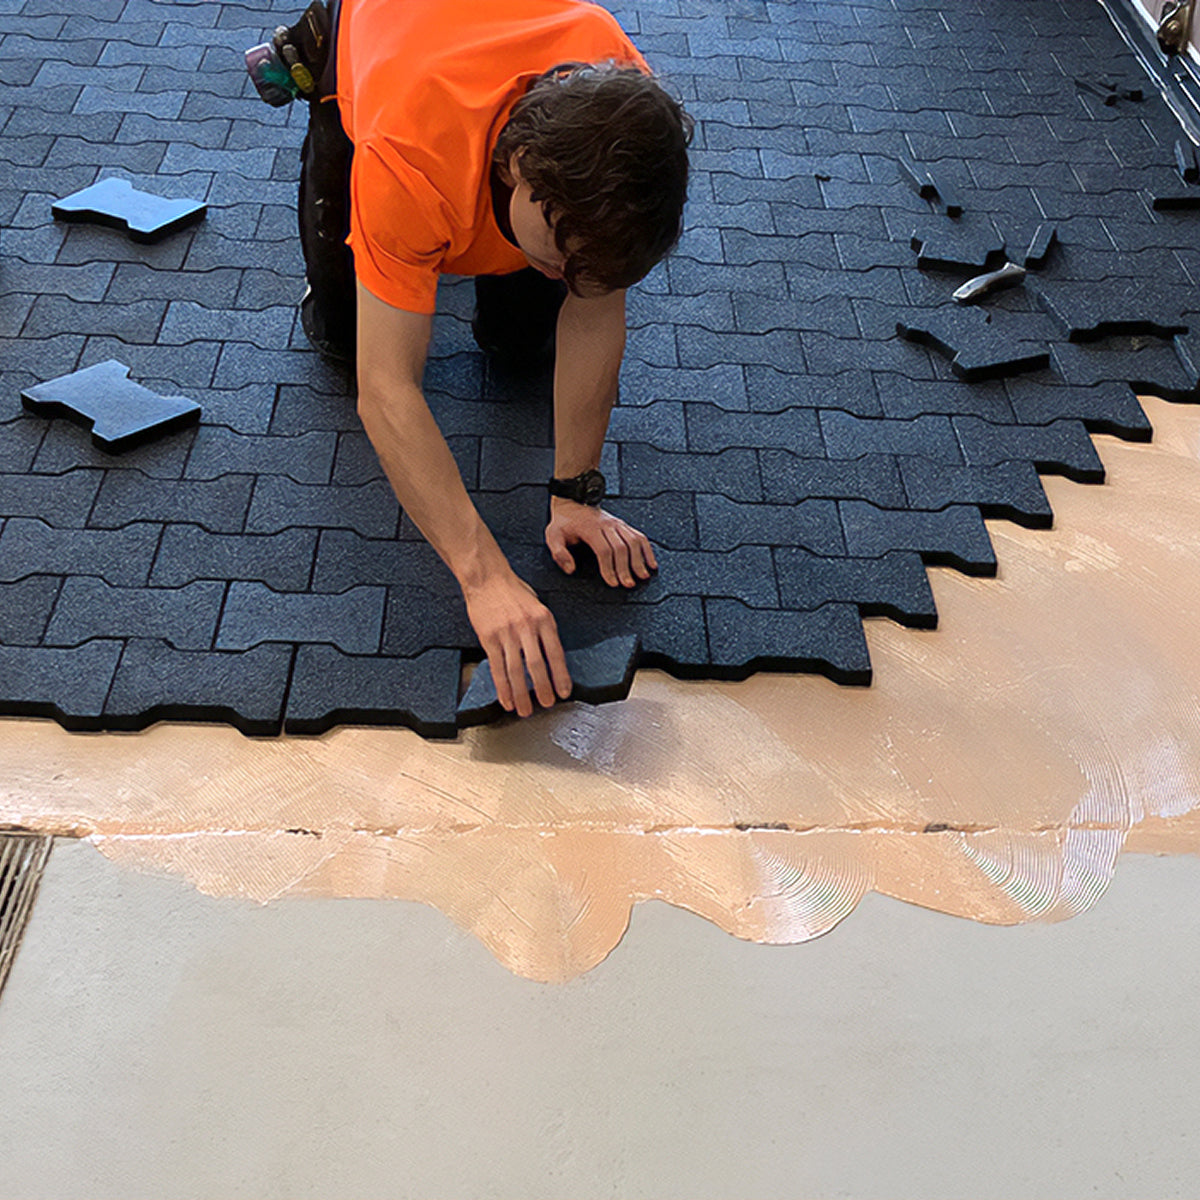
4. Apply adhesive: Use REGUPOL’s recommended adhesive and spread it evenly with a V-notched trowel.
· For rolls, align the first roll against the most suitable wall or perimeter and butt seams tightly (do not over-compress).
· For tiles, start from the centre and work outwards, pressing tiles down firmly into adhesive and butting edges tightly together.
5. Roll and finish: Use a floor roller to ensure good contact, and seal any edges with a joint sealer for a neat finish.
6. Wait before use: Avoid walking on the mats for 48 hours, and don’t place heavy loads for 72 hours.
Tip: For temporary installs or to loose lay installs over concrete, recommended mats can be laid edge-to-edge without adhesive, as their weight helps keep them in place.
Installing on Timber or Plywood
Timber needs to be smooth, dry, and securely fixed.
Steps:
1. Prepare the wood: Fix any loose boards and ensure the surface is level and clean.
2. Condition the mats: Let the mats adjust to the temperature.
3. Apply sealer: Apply REGUPOL barrier 99-101 moisture sealer to seal and prime the surface
4. Apply adhesive: Use REGUPOL’s recommended adhesive for timber.
5. Lay and trim: Place rolls or mats tightly together, trimming edges for a snug fit.
6. Roll and seal: Roll the mats and seal the edges of the REGUPOL flooring with FixAll High Tack for a finished look.
7. Allow to cure: Keep traffic off for 48 hours, and avoid heavy loads for 72 hours.
Installing on Asphalt
Asphalt is a great base for equine rubber flooring, especially in stables and walkways. The process is similar to concrete, with a few key differences:
Steps:
1. Let the asphalt cure: Make sure the asphalt is fully cured before installation.
2. High-pressure wash: Clean the asphalt thoroughly with a high-pressure washer to remove all dust, oil, and debris.
3. Check the surface: Ensure it’s level and free from cracks or loose spots.
4. No moisture sealer needed: Unlike concrete, you don’t need a moisture barrier on asphalt.
5. Apply REGUPOL adhesive: Use REGUPOL’s specialised adhesive for asphalt, spreading it evenly with a V-notched trowel.
6. Lay and finish: Lay the rolls or mats into specialised adhesive, press them firmly, and roll for good contact. Seal the edges with REGUPOL’s joint sealer.
7. Allow to set: Keep traffic off for 48 hours and avoid heavy loads for 72 hours to let the adhesive cure.

Installing on Compacted Bases
For outdoor stables, walkways, or areas without a hard floor, a well-prepared compacted base is crucial. This method follows best practices similar to those used for paver installation.
Steps:
1. Plan and mark out your area: Use stakes and string to outline the space. Check with local utilities to avoid pipes or cables.
2. Excavate and level: Remove grass or old material and dig down to create a flat area.
3. Add crushed stone: Lay 100–150mm of crushed rock or road base, then compact it well in layers. This prevents mats from shifting and allows drainage.
4. Add bedding sand: Spread a thin layer (approx. 20mm) of sharp, angular bedding sand and screed it flat.
5. (Optional) Lay geotextile fabric: For extra stability and to prevent weed growth, add a layer of geotextile before the sand.
6. Lay the mats or pavers: Start at one corner and work across, laying mats or pavers tightly together. For tiles, use a pattern (like brickwork) for best results.
7. Edge restraints: Install a border (like steel or timber edging) to keep mats in place and prevent spreading.
8. Check for gaps: Fill small gaps with sand or use a joint sealer for a tidy finish.
9. Final compaction: For pavers, use a plate compactor to lock them in place.
Tip: Always ensure the base slopes slightly for drainage, and check for buried utilities before digging.

Aftercare and Final Touches
· Protect the new surface: If other work is happening nearby, cover your mats to prevent damage.
· Allow to settle: Keep horses and heavy equipment off the mats for at least 48 hours after installation.
· Clean regularly: Sweep or hose down mats to keep them in top condition.
· Check edges: Inspect edges and seams regularly and reseal if needed.
Need Help? REGUPOL Is Here for You
Every stable is different, and site conditions can vary. If you’re unsure about any step or want to make sure you’re using the right products, REGUPOL Australia’s technical team is ready to help. Call 02 4624 0050 or email equinesales@regupol.com.au for expert advice.
With REGUPOL, you’re choosing quality, safety, and peace of mind for your horses and your property. Follow these simple steps and enjoy a premium equine surface that lasts for years.
For detailed technical support, always refer to the latest REGUPOL installation guides or contact their technical team for site-specific advice. All installations should comply with Australian Standard AS 1884:2021 for resilient flooring..
